II. Regular maintenance and sediment removal are necessary to keep the system running smoothly and effectively.
III. There are various methods for sediment removal, including manual flushing, chemical treatments, and the installation of sediment filters.
Sediment removal is a crucial aspect of maintaining the efficiency and longevity of solar-assisted water heaters. Over time, minerals and debris can accumulate in the system, leading to decreased performance and potential damage.
Regular sediment removal ensures optimal heat transfer and prevents clogging, allowing your solar-assisted water heater to operate at its best. By implementing effective sediment removal techniques, you can maximize the energy savings and environmental benefits of your solar-assisted water heater at the same time enjoying reliable hot water supply.
Keep your system running smoothly with proper sediment removal.
Perceiving Sediment Build-Up in Solar-Assisted Water Heaters
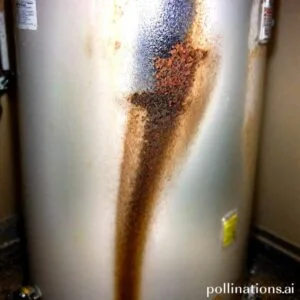
Sediment build-up is a common issue that many owners of solar-assisted water heaters may encounter. It refers to the accumulation of mineral deposits and other debris within the system, which can hinder its efficiency and performance.
1. What is Sediment Build-Up?
Sediment build-up occurs when minerals and other particles present in the water supply settle and collect inside the water heater system. These sediments can include calcium, magnesium, rust, and other impurities that are naturally present in water. Over time, the accumulation of sediment can lead to various problems.
2. Causes of Sediment Build-Up in Solar-Assisted Water Heaters
There are several factors that contribute to sediment build-up in solar-assisted water heaters. One of the main causes is the hardness of the water supply. Hard water contains a high concentration of minerals, which are more likely to precipitate and form sediment. Additionally, inadequate flushing or maintenance of the system can also contribute to sediment accumulation.
3. Effects of Sediment Build-Up on Solar-Assisted Water Heaters
The presence of sediment in a solar-assisted water heater can have detrimental effects on its performance and longevity. To begin with, it can reduce the efficiency of the system by insulating the heating elements, making it harder for the heat to transfer to the water. This can result in increased energy consumption and higher utility bills. In addition, sediment build-up can lead to corrosion and damage to the internal components of the water heater, potentially causing leaks and other malfunctions.
In order to prevent or minimize sediment build-up, regular maintenance and flushing of the solar-assisted water heater are necessary. This can involve draining and cleaning the tank, inspecting and replacing sacrificial anode rods, and ensuring proper water treatment to reduce mineral content. By approaching sediment build-up proactively, owners can ensure optimal performance and longevity of their solar-assisted water heaters.
| Causes of Sediment Build-Up | Effects of Sediment Build-Up |
|---|---|
| Hard water: High mineral content in the water supply. | Reduced efficiency: Insulation of heating elements leads to decreased heat transfer. |
| Inadequate maintenance: Lack of regular flushing and cleaning. | Corrosion and damage: Internal components may be affected, leading to leaks and malfunctions. |
Benefits of Sediment Removal for Solar-Assisted Water Heaters
Improved Heating Efficiency
One of the significant benefits of sediment removal for solar-assisted water heaters is improved heating efficiency. Sediment buildup in the water heater can hinder the transfer of heat, leading to decreased performance. By regularly removing sediment, the water heater can operate at its optimal level, ensuring efficient heating of water for various purposes.
Extended Lifespan of the Solar-Assisted Water Heater
Sediment accumulation can have a detrimental effect on the lifespan of a solar-assisted water heater. Over time, the sediment can cause corrosion and damage to the internal components, reducing the overall durability of the system. Regular removal of sediment helps to prevent such issues, thereby extending the lifespan of the water heater and ensuring its continued functionality for years to come.
Reduced Energy Costs
Another advantage of sediment removal is the reduction in energy costs associated with solar-assisted water heaters. When sediment builds up, the water heater needs to work harder to heat the water, leading to increased energy consumption. By removing sediment, the heater operates more efficiently, resulting in lower energy usage and decreased utility bills.
Methods of Sediment Removal for Solar-Assisted Water Heaters
Solar-assisted water heaters are a sustainable and energy-efficient option for heating water. In contrast, over time, sediment can accumulate in the tank, reducing its efficiency and lifespan. To ensure optimal performance and prolong the life of your solar-assisted water heater, indispensable to regularly remove sediment. Here are three effective methods for sediment removal:
1. Flushing the Tank
Flushing the tank is a simple yet effective method for removing sediment from your solar-assisted water heater. To do this, follow these steps:
- Turn off the water heater and allow the water to cool down.
- Locate the drain valve at the bottom of the tank.
- Attach a garden hose to the drain valve and place the other end in a suitable drainage area.
- Open the drain valve and let the water flow out, carrying the sediment with it.
- Keep the drain valve open until the water runs clear.
- Close the drain valve and remove the hose.
- Turn on the water heater and allow it to refill.
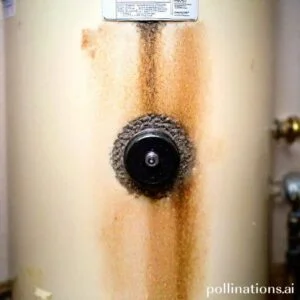
2. Using a Sediment Removal Tool
If flushing the tank does not completely remove the sediment, you can use a sediment removal tool to manually clean it. These tools are designed to break up and remove stubborn sediment deposits. Here’s how to use a sediment removal tool:
- Turn off the water heater and allow the water to cool down.
- Follow the manufacturer’s instructions to attach the sediment removal tool to a water hose.
- Insert the tool into the tank through the hot water outlet.
- Turn on the water supply to the tool and let it circulate inside the tank, dislodging and removing the sediment.
- Move the tool around the tank to ensure thorough cleaning.
- Once the water runs clear, turn off the water supply and remove the tool.
- Turn on the water heater and allow it to refill.
3. Hiring Professional Services
If you are unsure about performing sediment removal yourself or if the sediment build-up is extensive, it is advisable to hire professional services. Experienced technicians have the knowledge and equipment to safely and effectively remove sediment from solar-assisted water heaters. They can also inspect the system for any other issues and provide necessary maintenance.
Regular sediment removal is essential for the efficient and long-lasting operation of solar-assisted water heaters. By flushing the tank, using a sediment removal tool, or seeking professional assistance, you can ensure that your water heater continues to provide reliable hot water during minimizing energy consumption and maximizing its lifespan.

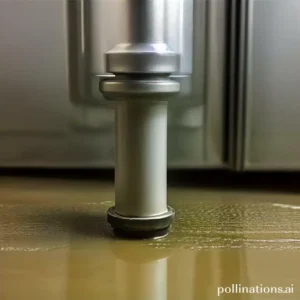
How to Flush a Solar-Assisted Water Heater
1. Turn Off Power Supply
Before starting the flushing process, it is crucial to ensure the safety of the operation. Begin by turning off the power supply to the solar-assisted water heater. This step will prevent any potential electrical hazards during the flush.
2. Connect a Hose to the Drain Valve
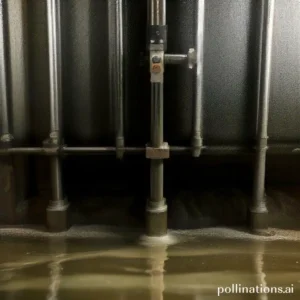
Locate the drain valve on the water heater. It is usually positioned near the bottom of the tank. Attach a hose to the drain valve securely. Make sure the other end of the hose is placed in an appropriate drainage area or outside where the water can safely flow.
3. Open the Drain Valve and Flush the Tank
Once the hose is properly connected, slowly open the drain valve. This will allow the water to flow out of the tank and into the hose. As the water begins to drain, observe the color and clarity. If the water appears murky or contains sediment, it is a sign that flushing is necessary.
Allow the water to flush out completely from the tank. This process may take several minutes. Patience is essential to ensure a thorough flush and removal of any accumulated debris or sediment.
4. Close the Drain Valve and Refill the Tank
After the tank has been completely flushed and the water runs clear, close the drain valve tightly. Remove the hose and ensure there are no leaks. It is crucial to close the drain valve properly to prevent any water leakage.
Once the drain valve is closed, it is time to refill the tank. Turn on the power supply to the solar-assisted water heater and allow it to heat the newly filled water. Monitor the water temperature to ensure it reaches the desired level.
| Steps | Description |
|---|---|
| 1 | Turn off power supply |
| 2 | Connect hose to drain valve |
| 3 | Open drain valve and flush the tank |
| 4 | Close drain valve and refill the tank |

Using Sediment Removal Tools for Solar-Assisted Water Heaters
Solar-assisted water heaters are an innovative and eco-friendly way to heat water for various purposes. Despite this, over time, sediment can build up in the system, affecting its efficiency and performance. To ensure optimal functioning, it is essential to periodically clean the system using sediment removal tools. In this section, we will traverse the different types of sediment removal tools available and how to use them effectively.
1. Types of Sediment Removal Tools
There are several sediment removal tools specifically designed for solar-assisted water heaters. These tools are designed to effectively remove sediment without causing any damage to the system. Here are some common types:
- Flush Kits: Flush kits are an excellent option for removing loose sediment from the system. They typically consist of a hose and a nozzle that can be connected to the water supply. By flushing water through the system, sediment is dislodged and flushed out.
- Dip Tubes: Dip tubes are long, narrow tubes that can be inserted into the water heater’s tank. They are designed to reach the bottom of the tank and remove sediment by siphoning it out.
- Anode Rods: Anode rods are sacrificial rods made of metals like magnesium or aluminum. They attract sediment and minerals, preventing them from settling in the tank. Regularly replacing anode rods can help minimize sediment buildup.
2. How to Use Sediment Removal Tools
Using sediment removal tools for solar-assisted water heaters is a straightforward process. Here’s a step-by-step guide:
- Turn off the Power: Before performing any maintenance or using sediment removal tools, it’s crucial to turn off the power supply to the water heater to ensure safety.
- Drain the Tank: Begin by draining the water heater’s tank. Connect a hose to the drain valve and direct it to a suitable drainage area. Open the valve and allow the water to flow out until the tank is empty.
- Choose the Appropriate Tool: Select the sediment removal tool that best suits your specific water heater model and situation. Refer to the manufacturer’s instructions for guidance if needed.
- Follow the Tool’s Instructions: Each sediment removal tool will have its own set of instructions. Follow them carefully to ensure proper usage and effective sediment removal.
- Flush or Extract Sediment: Depending on the tool you are using, either flush water through the system or insert the tool into the tank to extract sediment. Repeat the process as necessary until the water runs clear.
Regularly using sediment removal tools will help maintain the efficiency and longevity of your solar-assisted water heater. By removing sediment, you can ensure optimal heat transfer and reduce the risk of system malfunctions. Remember to consult the manufacturer’s guidelines and seek professional assistance if needed.
| Sediment Removal Tool | Benefits |
|---|---|
| Flush Kits | Easy to use and effective in removing loose sediment |
| Dip Tubes | Reach the bottom of the tank for thorough sediment removal |
| Anode Rods | Prevent sediment buildup by attracting minerals and sediment |
Bottom Line
Effective sediment removal is crucial for the optimal performance and longevity of solar-assisted water heaters. Sediment buildup can reduce the efficiency of the system and cause damage to the components. Regular maintenance and cleaning of the system can prevent sediment accumulation and ensure smooth operation. Various sediment removal methods, such as flushing, draining, and filtration, can be used depending on the type and amount of sediment. Imperative to follow the manufacturer’s instructions and seek professional help if necessary. By taking proper care of the system, homeowners can enjoy the benefits of solar-assisted water heaters, including energy savings and reduced environmental impact, for many years to come.
In conclusion, sediment removal is an essential aspect of solar-assisted water heater maintenance that should not be overlooked. By keeping the system clean and free of sediment, homeowners can maximize its efficiency and lifespan, and contribute to a more sustainable future.
Read More:
1. Sediment Removal And Water Heater Temperature Pressure Relief Valve
2. Sediment Removal Frequency For Vacation Homes