II. One common issue related to sediment buildup is a malfunctioning pilot light, which can be caused by blockage in the gas line or thermocouple due to sediment accumulation.
III. Regular maintenance, such as flushing the tank and cleaning the burner assembly, can help prevent sediment buildup and pilot light issues, ensuring optimal performance and longevity of the water heater.
Sediment buildup in water heaters can lead to reduced efficiency and potential damage. In this article,we will traverse effective methods for removing sediment and maintaining optimal performance.
Additionally, we will address common issues with water heater pilot lights, such as failure to ignite or frequent extinguishing. By grasping these issues and implementing the appropriate solutions, homeowners can ensure a reliable and efficient water heating system.
Sediment Removal
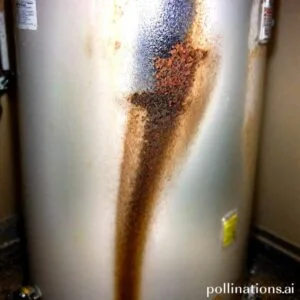
Sediment buildup in water heaters can be a common issue that affects the performance and efficiency of the appliance. Over time, minerals and other particles can accumulate at the bottom of the tank, reducing its capacity and potentially causing damage.
1. What is sediment buildup in water heaters?
Sediment buildup refers to the accumulation of minerals, debris, and other particles that settle at the bottom of a water heater tank. These sediments can include calcium, magnesium, sand, rust, and other impurities found in the water supply.
2. Signs of sediment buildup
There are a few indicators that your water heater may be experiencing sediment buildup. First, you may notice a decrease in hot water supply or a reduction in water pressure. This is because sediments take up space in the tank, leaving less room for the water to heat up and flow properly. Additionally, you may hear unusual noises coming from the tank, such as popping or rumbling sounds, as the sediments heat up and create steam pockets.
3. Steps for sediment removal
To remove sediment from your water heater, follow these steps:
- Turn off the power supply to the water heater and allow it to cool down.
- Locate the drain valve at the bottom of the tank and attach a hose to it.
- Place the other end of the hose in a suitable drainage area, such as a floor drain or outside.
- Open the drain valve and allow the water to flow out, flushing out the sediments.
- Close the drain valve once the water runs clear.
- Turn on the water supply to refill the tank.
4. Frequency of sediment removal
The frequency of sediment removal depends on various factors, such as the quality of your water supply and the usage of your water heater. As a general guideline, it is recommended to flush out the sediments at least once a year. Although, if you notice signs of sediment buildup or experience a significant decrease in performance, it may be necessary to perform the removal more frequently.
Regular sediment removal not only helps maintain the efficiency of your water heater but also extends its lifespan. By abiding by these steps and ensuring proper maintenance, you can enjoy a reliable and efficient supply of hot water in your home.
| Benefits of Sediment Removal |
|---|
| Improved Efficiency: Removing sediment allows the heating element to work more effectively, saving energy and reducing utility bills. |
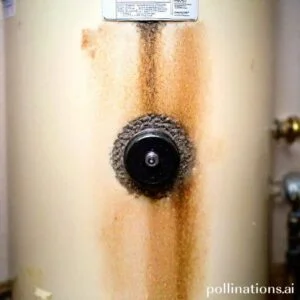
| Extended Lifespan: Sediment buildup can lead to corrosion and damage to the tank, shortening its lifespan. Regular removal helps prevent these issues and prolongs the water heater’s durability. |
| Enhanced Water Quality: Sediment can affect the taste and quality of your hot water. Removing it ensures cleaner and better-tasting water for various household activities. |
Pilot Light Issues
A pilot light is a small flame that is constantly burning in certain gas appliances, such as water heaters, furnaces, and stoves. It serves as an ignition source for the main burner, allowing the appliance to function properly.
Common Pilot Light Issues
- 1. Pilot light won’t stay lit:
- 2. Weak or irregular flame:
- 3. Excessive soot or carbon buildup:
One of the most common issues with a pilot light is that it won’t stay lit. This can be caused by a variety of factors, such as a dirty or clogged pilot light orifice, a faulty thermocouple, or a gas supply issue. Pivotal to address this problem promptly to ensure the appliance functions correctly.
If the pilot light flame appears weak or irregular, it may indicate a problem with the gas pressure or a blockage in the gas line. This can affect the performance of the appliance and should be resolved to avoid further complications.
If you notice excessive soot or carbon buildup around the pilot light, it could indicate an issue with the air-to-gas ratio. This can lead to inefficient combustion and potential safety hazards. Regular cleaning and maintenance can help prevent this problem.
Steps for Pilot Light Maintenance
Proper maintenance of the pilot light is essential to ensure its efficient operation. Follow these steps:
- Turn off the gas supply to the appliance.
- Allow the appliance to cool down completely.
- Clean the pilot light orifice using a small brush or compressed air.
- Inspect the thermocouple for any signs of damage or wear. Replace if necessary.
- Remove any debris or blockages from the pilot light assembly.
- Turn on the gas supply and relight the pilot light according to the manufacturer’s instructions.
When to Call a Professional
Meanwhile some pilot light issues can be resolved through basic maintenance, there are instances where professional assistance is necessary. Consider calling a professional if:
- The pilot light continues to go out despite proper maintenance.
- There is a strong gas odor or signs of a gas leak.
- You are unsure about how to safely perform maintenance on the appliance.
Tools Needed
Sediment removal is an important task for maintaining the efficiency of your appliances. To effectively remove sediment, you will need the following tools:
Sediment Removal Tools
– A bucket: This will be used to collect the sediment that is removed from your appliances. Make sure it is large enough to hold the sediment.
– A hose: You will need a hose to flush out the sediment from your appliances. A long hose is recommended for easy access.
– A wrench: This tool will be used to disconnect and reconnect the water supply lines to your appliances. Make sure you have the correct size wrench for your specific appliances.
Pilot Light Maintenance Tools
– A screwdriver: You will need a screwdriver to access the pilot light assembly on your appliances. Make sure you have both a flathead and a Phillips head screwdriver.
– A wire brush: This tool will be used to clean the pilot light assembly and remove any buildup or debris. Make sure you choose a wire brush with bristles that are appropriate for your specific appliances.
– A flashlight: A flashlight will help you see inside the appliance and ensure that the pilot light is properly cleaned and maintained.

Safety Precautions
1. Importance of safety precautions
Pertaining to any task involving potentially hazardous materials or equipment, safety precautions are of utmost importance. By taking the necessary measures to protect yourself and those around you, you can prevent accidents and ensure a safe working environment.
Whether you are performing sediment removal or pilot light maintenance, following safety protocols is essential to minimize risks and potential injuries. Mastering the significance of safety precautions will help you prioritize them in your daily operations.
2. Safety precautions for sediment removal
When undertaking sediment removal, it is crucial to adopt specific safety measures. Sediment can contain harmful substances and pose risks to both human health and the environment. Here are some key safety precautions to consider:
- Wear appropriate personal protective equipment (PPE) such as gloves, goggles, and respiratory masks to shield yourself from potential hazards.
- Ensure proper ventilation in the area where sediment removal is taking place to prevent the buildup of harmful gases.
- Follow proper disposal procedures for the collected sediment to avoid contamination.
- Regularly inspect and maintain equipment used for sediment removal to ensure its safe operation.
3. Safety precautions for pilot light maintenance
When dealing with pilot light maintenance, it is essential to prioritize safety to prevent accidents and potential gas leaks. Here are some safety precautions to keep in mind:
- Before performing any maintenance tasks, make sure to turn off the gas supply and allow the pilot light to cool down.
- Use proper tools and equipment to avoid accidents and ensure accurate adjustments.
- Regularly inspect the pilot light and its surrounding area for any signs of damage or gas leaks.
- If you detect a gas leak or any other safety concern, immediately shut off the gas supply and seek professional assistance.
| Topic | Key Points |
|---|---|
| Importance of safety precautions | – Prevent accidents and injuries – Create a safe working environment |
| Safety precautions for sediment removal | – Use proper PPE – Ensure proper ventilation – Follow proper disposal procedures – Regular equipment inspection |
| Safety precautions for pilot light maintenance | – Turn off gas supply and allow cooling – Use proper tools – Regular inspection for damage or leaks – Immediate action for gas leaks |

Troubleshooting
Sediment Removal Issues
If you’re experiencing sediment removal issues with your article, don’t worry – we’re here to help! Sediment build-up can be a common problem, but with some simple troubleshooting steps, you’ll have your article back in top shape in no time.
Check the Filter
The first step in troubleshooting sediment removal issues is to check the filter. Sediment can often clog the filter, preventing proper water flow. Remove the filter and clean it thoroughly, removing any sediment or debris that may have accumulated. Once cleaned, reattach the filter and test the article again.
Flush the System
If cleaning the filter doesn’t resolve the sediment removal issues, it may be necessary to flush the system. To do this, turn off the article and locate the drainage valve. Open the valve and allow the water to flow out, flushing out any sediment that may be causing the problem. Close the valve and turn the article back on to see if the issue has been resolved.
Pilot Light Issues
If you’re having trouble with the pilot light on your article, follow these troubleshooting steps to get it back up and running.
Check the Gas Supply
The first thing to do when troubleshooting pilot light issues is to check the gas supply. Make sure the gas valve is fully open and that there is an adequate supply of gas. If the gas supply is low or the valve is partially closed, the pilot light may not ignite properly. Adjust the gas supply as needed and try relighting the pilot light.
Clean the Pilot Assembly
If the gas supply is not the issue, the next step is to clean the pilot assembly. Over time, the pilot assembly can become dirty or clogged, preventing the pilot light from igniting. Use a small brush to gently clean the pilot assembly, removing any debris or build-up. Once clean, try relighting the pilot light.
Bottom Line
In terms of sediment removal, prevention is key. Regular maintenance and flushing of your water heater can help prevent sediment buildup and prolong the life of your appliance. Notwithstanding, if you do experience issues with your water heater pilot light, it’s important to address them promptly to avoid potential safety hazards. Always follow manufacturer instructions and consult a professional if you’re unsure about any aspect of water heater maintenance or repair.
By staying proactive and informed about your water heater, you can ensure that it continues to provide reliable hot water for your home or business. Don’t let sediment buildup or pilot light issues go unchecked – take action to keep your water heater running smoothly and safely.
Read More:
1. Impact Of Sediment On Tankless Water Heater Flow Rate
2. Sediment Removal And Water Heater Maintenance Cost