II. The first step is to turn off the power supply to the water heater and shut off the cold water supply valve.
III. Once the tank is empty, turn on the cold water supply valve and let the water run through the tank until it runs clear, then turn the power supply back on.
Flushing an electric water heater is a crucial maintenance task that ensures optimal performance and extends its lifespan. By adhering to a few simple steps, you can effectively remove sediment buildup and improve efficiency.
First, turn off the power supply to the heater and let the water cool down. Next, attach a hose to the drain valve and place the other end in a suitable drainage area.
Open the drain valve and allow the water to flow until it runs clear. Finally, close the drain valve, remove the hose, and turn the power supply back on.
Regularly flushing your electric water heater will ensure a reliable and efficient supply of hot water.
Turn off power supply
Turning off the power supply before flushing is of utmost importance to ensure your safety and prevent any electrical damage. Here is a step-by-step guide on how to turn off the power supply:
1. Importance of turning off power supply before flushing
Before flushing any electrical device, it is crucial to turn off the power supply. This prevents any electrical surges or short circuits that could potentially harm you or damage the device. Flushing without turning off the power supply can lead to electrocution or even fires.
2. Step-by-step guide on how to turn off power supply
To turn off the power supply, follow these steps:
- Locate the main electrical panel: The main electrical panel is usually found in the basement or utility room. It contains circuit breakers or fuses.
- Identify the correct breaker or fuse: Look for the breaker or fuse that corresponds to the device you want to flush.
- Switch off the breaker or remove the fuse: If it is a breaker, flip the switch to the “off” position. If it is a fuse, carefully remove it from the panel.
- Double-check the power is off: Use a voltage tester to ensure there is no electricity flowing to the device.
| Important Note: | Always exercise caution when dealing with electricity. If you are unsure or uncomfortable with turning off the power supply, it is recommended to seek professional assistance. |
|---|
Drain the tank
Draining the tank is an essential step before flushing your system. By removing the stagnant water, you ensure a clean and efficient process. Follow this step-by-step guide to drain the tank effectively:
1. Importance of draining the tank before flushing
Before flushing your system, it is crucial to drain the tank completely. This step helps eliminate any sediments or debris that may have settled at the bottom of the tank. In doing this, you prevent these contaminants from entering your pipes and causing clogs or damage.
2. Step-by-step guide on how to drain the tank
To drain the tank, follow these simple steps:
- Turn off the water supply: Locate the shut-off valve near the tank and turn it off to stop the water flow.
- Attach a hose: Connect a garden hose to the drain valve at the base of the tank. Ensure the other end of the hose is placed in a suitable drainage area.
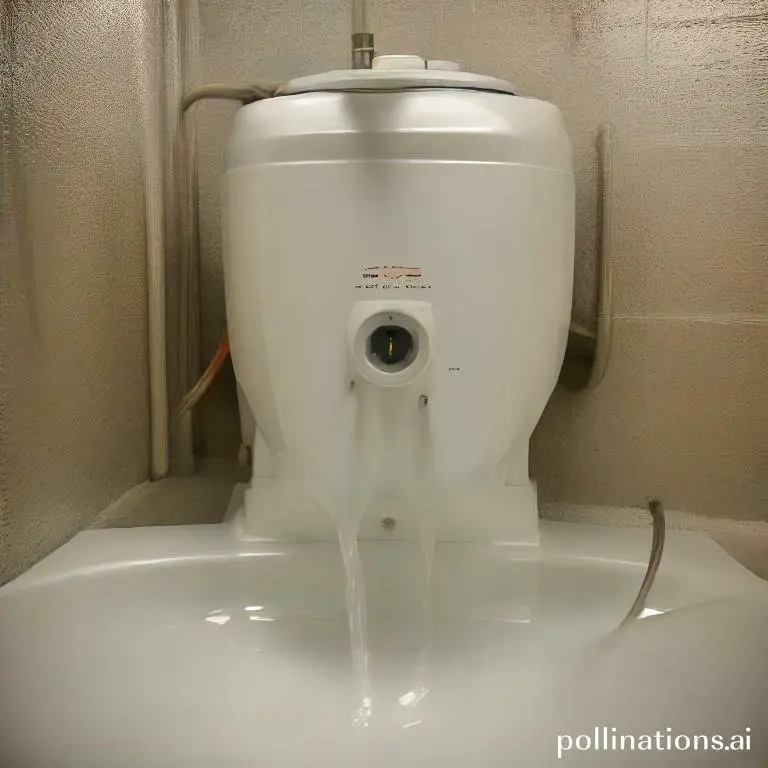
- Open the drain valve: Slowly open the drain valve to allow the water to flow out through the hose. Be cautious as the water may be hot.
- Flush the tank: Once the tank is empty, turn on the water supply briefly to flush out any remaining residue. Then, turn it off again.
- Close the drain valve: After flushing, close the drain valve tightly to prevent any leaks.
Following these steps will help you effectively drain your tank before flushing, ensuring a clean and efficient system. Remember to exercise caution and take necessary safety measures throughout the process.
Flush the Tank
Flushing the tank is an essential maintenance task that helps remove sediment buildup, ensuring optimal performance and longevity of your tank. In this guide, we will take you through the step-by-step process of flushing the tank, ensuring a clean and efficient system.
1. Importance of Flushing the Tank to Remove Sediment Buildup
Sediment buildup in a tank can lead to various issues, including reduced water flow, decreased heating efficiency, and even damage to the tank itself. Flushing the tank regularly helps prevent these problems by removing accumulated sediment.
- Improved Performance: Flushing the tank removes sediment, allowing water to flow freely and ensuring optimal performance.
- Increased Efficiency: Sediment buildup can hinder heating elements, reducing the efficiency of your tank. Flushing helps maintain efficient heating and lower energy consumption.
- Extended Lifespan: Sediment can corrode the tank, leading to leaks and premature failure. Flushing helps prolong the lifespan of your tank, saving you money in the long run.
2. Step-by-Step Guide on How to Flush the Tank
Follow these simple steps to flush your tank and keep it in top condition:
Step 1: Turn Off the Power
Before starting the flushing process, make sure to turn off the power supply to the tank. This ensures your safety and prevents any potential damage to the system.
Step 2: Locate the Drain Valve
Find the drain valve on your tank. It is usually located near the bottom and may have a hose attached to it. Prepare a bucket or a hose to collect the discharged water.
Step 3: Open the Drain Valve
Slowly open the drain valve to release the water from the tank. Be cautious as the water might be hot. Allow the tank to completely drain before proceeding to the next step.
Step 4: Flush the Tank
With the drain valve still open, turn on the cold water supply to the tank. The incoming water will help flush out any remaining sediment. Let the water flow for a few minutes or until it runs clear.
Step 5: Close the Drain Valve and Refill the Tank
Once the water runs clear, close the drain valve. Turn on the power supply to the tank and allow it to refill. Check for any leaks and ensure proper functionality.
Refill the Tank
Importance of Refilling the Tank after Flushing
In terms of maintaining the optimal performance of your tank, refilling it after flushing is of utmost importance. Flushing your tank helps to remove any accumulated sediment or debris, ensuring clean and fresh water for your household. Nevertheless, it is equally important to refill the tank promptly after flushing to ensure a continuous water supply.
Refilling the tank after flushing helps to restore the water level to its normal capacity, allowing for proper functioning of the plumbing system. It ensures that there is enough water available for regular use, such as flushing toilets, running faucets, and operating appliances that require water.
Furthermore, refilling the tank after flushing helps to maintain the structural integrity of the tank itself. When the tank is left empty for prolonged periods, it can lead to drying and cracking of the tank material, compromising its durability. By promptly refilling the tank, you can prevent any potential damage and extend the lifespan of your tank.
Step-by-Step Guide on How to Refill the Tank
Refilling the tank after flushing is a simple process that can be done in a few easy steps:
Step 1: Turn on the Water Supply
Locate the water supply valve connected to your tank and turn it on. This will allow water to flow into the tank and refill it.
Step 2: Monitor the Water Level
Meanwhile the tank is being refilled, keep an eye on the water level. Ensure that it is gradually rising and reaching the desired capacity.
Step 3: Check for Leaks
Once the tank is refilled, inspect the connections and valves for any potential leaks. Tighten any loose fittings or replace faulty components if necessary.
Step 4: Test the Water Supply
After refilling the tank, test the water supply by flushing toilets, running faucets, and using other water-dependent appliances. Ensure that the water flow is steady and consistent.

Turn on power supply
When refilling your device, it is crucial to remember the importance of turning on the power supply. This step is often overlooked, but it plays a significant role in ensuring the proper functioning of your equipment. Follow this step-by-step guide to turn on the power supply:
1. Importance of turning on power supply after refilling
Turning on the power supply after refilling is essential for several reasons. Initially, it allows the device to initiate the necessary processes for operation. Without power, the device will not be able to function and provide the desired results. Furthermore, it ensures that the refilled components are properly integrated and connected to the power source. This step guarantees the seamless flow of energy and prevents any potential damage or malfunction.
2. Step-by-step guide on how to turn on power supply
Follow these simple steps to turn on the power supply after refilling:
- Step 1: Locate the power switch or button on your device. It is usually marked with a recognizable symbol or labeled as “power.”
- Step 2: Ensure that the power switch is in the “off” position before proceeding.
- Step 3: Connect your device to a reliable power source, such as a wall outlet or a fully charged battery.
- Step 4: Once the power source is connected, gently flip the power switch to the “on” position.
- Step 5: Listen for any audible cues or observe indicator lights to confirm that the power supply is successfully turned on.
Bottom Line
Flushing an electric water heater is an essential maintenance task that should be performed at least once a year to ensure its longevity and efficiency. Neglecting this task can lead to sediment buildup, corrosion, and even failure of the heating element. The process involves turning off the power supply, draining the tank, flushing out the sediment, and refilling the tank. It is a simple and cost-effective way to extend the life of your water heater and improve its performance. Regular maintenance can also save you money on energy bills and prevent costly repairs. So, don’t wait until it’s too late, follow these steps and keep your electric water heater running smoothly for years to come.
Read More:
1. Can I Flush My Water Heater Without A Hose?
2. Best Time Of The Year To Flush A Water Heater


