II. Regular flushing can prevent sediment buildup and prolong the life of your water heater.
III. Flushing should be done annually and can be done easily with the right tools and instructions.
Flushing your water heater is an essential maintenance task that can intensify its longevity and functionality. Over time, sediment and mineral buildup can accumulate in the tank, causing clogs and reducing efficiency.
Flushing the tank removes these deposits, improving valve functionality and ensuring the water heater operates at peak performance. In this article, we’ll explain how to flush your water heater and provide tips for maintaining its optimal performance.
Cognizing Water Heater Valves
1. Types of Water Heater Valves
Water heater valves play a crucial role in the safe and efficient operation of your water heater. There are several types of valves commonly found in water heaters:
| Valve Type | Description |
|---|---|
| Temperature Relief Valve | The temperature relief valve is designed to release excess pressure and prevent the water heater from exploding in case the temperature exceeds a safe level. This valve is typically located near the top of the tank. |
| Pressure Relief Valve | The pressure relief valve, also known as the T&P valve (Temperature and Pressure relief valve), is responsible for relieving excess pressure buildup in the water heater. It is designed to open and release water if the pressure inside the tank becomes too high. |
| Drain Valve | The drain valve is used for draining the water heater tank for maintenance or repair purposes. It is typically located near the bottom of the tank and is connected to a hose or pipe to direct the water flow. |
2. Function of Each Valve
Each water heater valve serves a specific function in ensuring the safe and efficient operation of the water heater:
- Temperature Relief Valve: The temperature relief valve is designed to prevent the water heater from overheating by releasing excess pressure and hot water.
- Pressure Relief Valve: The pressure relief valve protects the water heater from exploding or causing damage due to excessive pressure buildup.
- Drain Valve: The drain valve allows for easy draining of the water heater tank, which is necessary for maintenance, flushing, or replacing the heating elements.
3. Importance of Valves in Water Heater Functioning
The valves in a water heater are essential for maintaining the proper functioning and safety of the unit. Without these valves, the water heater could overheat, build up dangerous pressure, or become difficult to maintain. Regular inspection and maintenance of these valves are crucial to ensure their proper operation and prevent potential problems.
For example, a malfunctioning temperature relief valve could lead to scalding hot water, posing a significant risk to users. Similarly, a faulty pressure relief valve could result in a dangerous explosion if the pressure inside the tank becomes too high.
Therefore, mastering the different types of water heater valves and their functions is vital for homeowners to ensure the efficient and safe operation of their water heaters.
Common Water Heater Valve Problems
Water heater valves play a crucial role in ensuring the efficient and safe operation of your water heater. Nevertheless, like any other component, they can experience various issues that may disrupt the functionality of your water heater system. In this section, we will discuss the most common problems associated with water heater valves and provide valuable insights on how to address them.
1. Sediment buildup
Sediment buildup is a prevalent issue that affects water heater valves. Over time, minerals and debris present in the water supply can accumulate in the valves, hindering their proper functioning. This buildup can restrict water flow, leading to reduced water pressure and inefficient heating. To prevent sediment buildup, it is recommended to flush the water heater regularly and install a sediment filter.
2. Corrosion
Corrosion is another significant problem that can affect water heater valves. Corrosion occurs when the metal components of the valves come into contact with water, oxygen, and other corrosive substances. Over time, this can lead to rusting and deterioration of the valves, resulting in leaks or complete valve failure. Regular inspection and maintenance can help identify and address corrosion issues early on.
3. Leaks
Leaks are perhaps the most concerning problem associated with water heater valves. Leaks can occur due to various reasons, such as valve deterioration, loose connections, or excessive pressure. It is essential to address leaks promptly to prevent water damage and potential safety hazards. In some cases, replacing the faulty valve may be necessary to resolve the issue.
4. Malfunctioning valves
Malfunctioning valves can cause a range of problems, including inadequate hot water supply, fluctuating water temperatures, or even complete system failure. Valve malfunctions can be attributed to issues such as faulty thermostats, broken seals, or mechanical failures. Regular maintenance and inspection can help identify and rectify valve malfunctions before they escalate.
Importance of Flushing Water Heater Valves
1. Benefits of Flushing Valves
Regularly flushing your water heater valves is crucial for maintaining the optimal performance and longevity of your water heating system. Flushing the valves helps remove sediment buildup, which can accumulate over time and negatively impact the efficiency of your heater. By flushing the valves, you can:
- Augment Efficiency: Flushing the valves removes sediment that can hinder the heating process, allowing your water heater to operate more efficiently.
- Prolong Lifespan: Sediment buildup can cause corrosion and damage to the internal components of your water heater. Flushing the valves prevents this, extending the lifespan of your system.
- Improve Water Quality: Sediment accumulation can lead to impurities in your water supply. Flushing the valves helps maintain clean and clear water, free from any potential contaminants.
2. When to Flush Valves
It is recommended to flush your water heater valves at least once a year, or more frequently if you notice any signs of sediment accumulation. Some indications that it’s time to flush the valves include:
- Reduced Hot Water Flow: If you notice a decrease in hot water pressure or flow, it may be a sign that sediment has built up in the valves.
- Noisy Operation: Sediment buildup can cause your water heater to make popping or cracking sounds. Flushing the valves can help alleviate this issue.
- Rusty Water: If you observe a reddish or rusty color in your hot water, it is a clear indication that sediment and corrosion are present. Flushing the valves will help eliminate this discoloration.
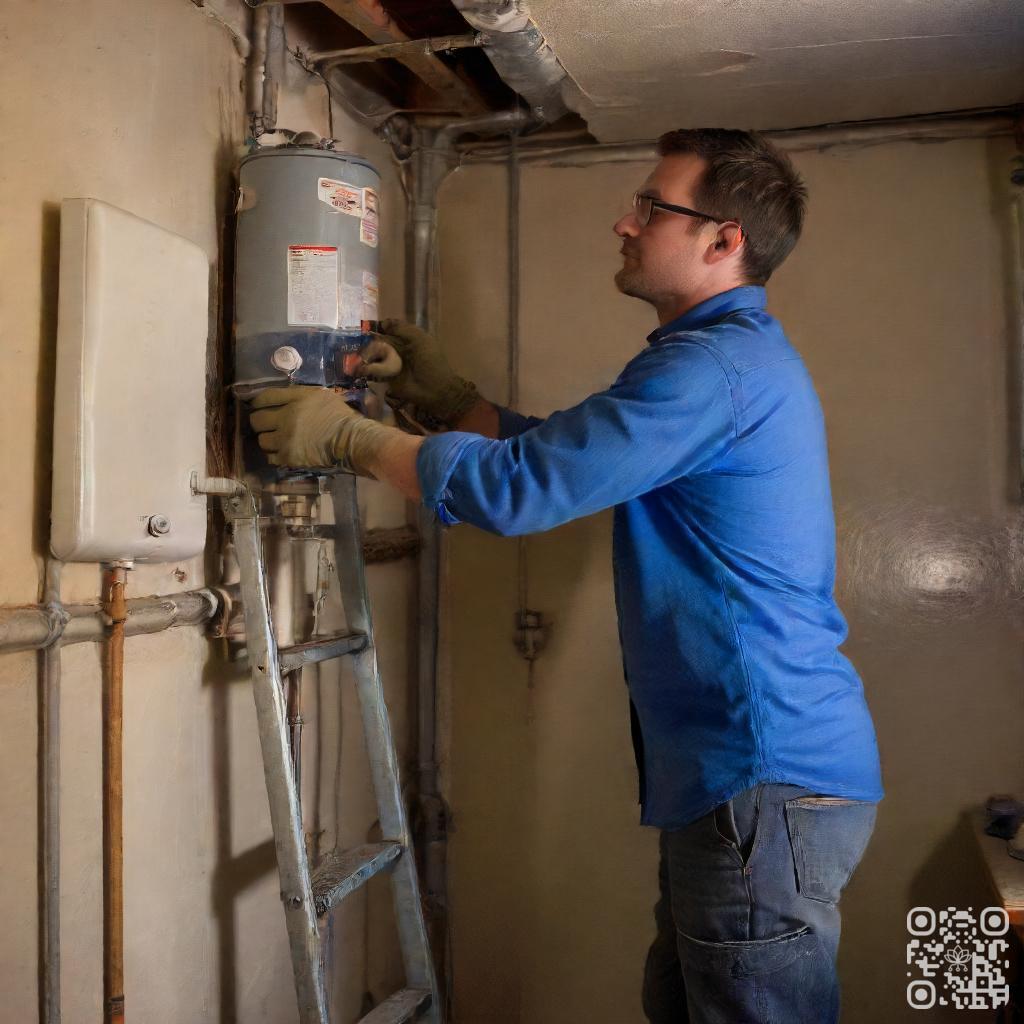
3. How to Flush Valves
Flushing your water heater valves is a relatively simple process that can be done following these steps:
- Turn Off the Power: Before flushing, ensure that the power supply to your water heater is switched off to avoid any accidents.
- Attach a Hose: Connect a garden hose to the drain valve located at the bottom of the water heater.
- Open the Valves: Slowly open both the cold water supply valve and the drain valve to allow the water to flow out through the hose.
- Flush the Valves: Let the water flow for a few minutes until it runs clear, indicating that all sediment has been flushed out.
- Close the Valves: Once the water runs clear, close the drain valve followed by the cold water supply valve.
- Restore Power: Finally, turn the power back on and allow the water heater to refill and heat the water.
Steps to Flushing Water Heater Valves
1. Preparation
Before you begin flushing your water heater valves, it’s important to prepare yourself and gather the necessary tools. Make sure you have the following items on hand:
- Protective gloves
- Bucket or hose
- Screwdriver or wrench
2. Shutting off water supply
The first step in flushing your water heater valves is to shut off the water supply. Locate the main water shut-off valve in your home and turn it off. This will prevent any water from flowing into the tank whilst you work.
3. Draining the tank
Next, you’ll need to drain the tank of any remaining water. Attach a hose to the drain valve located at the bottom of the tank. Place the other end of the hose in a bucket or direct it outside. Open the valve and allow the water to flow out until it stops.
4. Flushing the valves
Once the tank is empty, it’s time to flush the valves. Start by locating the pressure relief valve and opening it to release any built-up pressure. Then, locate the cold water inlet valve and open it for a few seconds to flush out any sediment or debris.
5. Refilling the tank
After flushing the valves, close them both and remove the hose from the drain valve. Turn the water supply back on and allow the tank to refill. Once the tank is full, check for any leaks and make sure everything is functioning properly.
| Step | Description |
|---|---|
| 1 | Preparation |
| 2 | Shutting off water supply |
| 3 | Draining the tank |
| 4 | Flushing the valves |
| 5 | Refilling the tank |
Tips for Flushing Water Heater Valves
1. Safety Precautions
Flushing the water heater valves is an important maintenance task to ensure the efficiency and longevity of your water heater. Notwithstanding, it is crucial to observe certain safety precautions to avoid any accidents or injuries. Here are some important safety tips to keep in mind:
- Turn off the power: Before starting the flushing process, make sure to turn off the power supply to the water heater. This will prevent any electrical shocks at the same time working on the valves.
- Allow the water to cool: Hot water can cause burns, so it’s essential to allow the water heater to cool down before attempting to flush the valves.
- Use protective gear: Wear gloves and eye protection to protect yourself from hot water or any debris that may come out during the flushing process.
- Release pressure: Before opening the valves, release any built-up pressure by opening a hot water faucet in your home.
2. Tools Required for Flushing
To effectively flush the water heater valves, you will need a few tools. Here are the tools you should have on hand:
- Bucket: A bucket will be useful for collecting the water and debris that come out during the flushing process.
- Hose: You will need a hose to connect to the drain valve of the water heater and direct the water flow into the bucket or a suitable drainage area.
- Adjustable wrench: An adjustable wrench is necessary for opening and closing the valves securely.
3. Common Mistakes to Avoid
At the same time flushing the water heater valves, it’s important to avoid some common mistakes that could cause damage or hinder the effectiveness of the process. Here are a few mistakes to steer clear of:
- Skipping regular maintenance: Flushing the water heater valves should be part of your regular maintenance routine. Neglecting this task can lead to sediment buildup and reduced efficiency.
- Forgetting to turn off the power: Failing to turn off the power supply to the water heater can result in electrical hazards. Always double-check that the power is off before starting the flushing process.
- Not allowing the water to cool: Flushing hot water can cause burns. Give your water heater enough time to cool down before attempting to flush the valves.
| Valve Flushing Steps | Duration |
|---|---|
| Turn off the power supply | 5 minutes |
| Allow the water to cool | 30 minutes |
| Attach hose to drain valve | 2 minutes |
| Open drain valve | 5 minutes |
| Flush the valves | 10 minutes |
| Close drain valve | 2 minutes |
| Turn on the power supply | 5 minutes |
Bottom Line
Flushing your water heater is an essential maintenance task that can improve the functionality of your valve. Over time, sediment and mineral buildup can cause your valve to malfunction, leading to leaks and other issues. By flushing your water heater regularly, you can remove these deposits and keep your valve working properly. It’s important to follow the manufacturer’s instructions and safety guidelines when flushing your water heater, and to seek professional help if you’re unsure about the process. With proper maintenance, your water heater can provide reliable hot water for years to come.
Don’t neglect your water heater valve – take the time to flush it regularly and keep it in good working order. Hence, you can avoid costly repairs and ensure that your hot water supply is always available when you need it.
Read More:
1. Flushing And Its Impact On Water Heater Anode Replacement
2. How To Flush A Water Heater With A Recirculating Pump?